How to Blur The Background of a Picture on iPhone
Taking a hurried photo on your iPhone because you finally found that good spot to take a picture in front of, but when you finally look back on the same photo on your phone the background is better off blurred. It is easy where the subject stays in sharp focus while the background is beautifully blurred.
Luckily, if you took that photo on your iPhone you can conveniently blur the background, and bring your object to the centre of all the focus. If you are unaware of how to blur the background of a picture on iPhone, you will be pleased to know that there are multiple ways to do that.
Method 1: Blur the Background of A Picture On iPhone With Portrait Mode
If you want to experiment a little with your photography skills on your iPhone you might want to twist things up a bit. For instance, instead of taking a photo with your regular camera, you can switch to the portrait mode and get fairly decent pictures out of it.
1. If you have tried it before and you feel like the pictures don’t quite do justice to the object you are trying to focus on, you can follow these steps on how to blur background on iPhone and perhaps your pictures might turn out better than expected.
2. Open your camera app on your iPhone that by default is set to a regular camera. Swipe so your camera can be set to portrait mode.
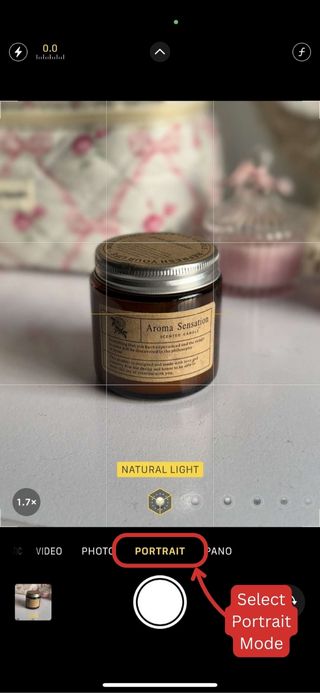
3. You can instantly focus on your subject and take the photo by clicking on the shutter. But if the results don’t seem as natural as you would like them to be you could make adjustments to the settings.
4. At the bottom, you would have options to adjust the brightness of the photo. This includes Natural Light, Studio Light, Contour Light, Stage Light, Stage Light Mono and High-Key Light Mono.
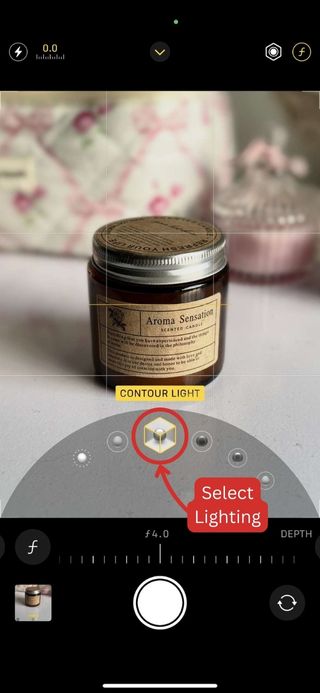
Note: You can experiment with the lightning features by swiping on them and clicking the photo.
5. If you are not satisfied with the level of focus you are getting by clicking a picture in portrait mode, you can adjust the focus before clicking on the photo.
6. Simply find the “f” icon on the top right and the levels of focus will appear at the bottom. You can blur the background of the photo and further adjust these levels by swiping across the scale and setting it to your desired focus.
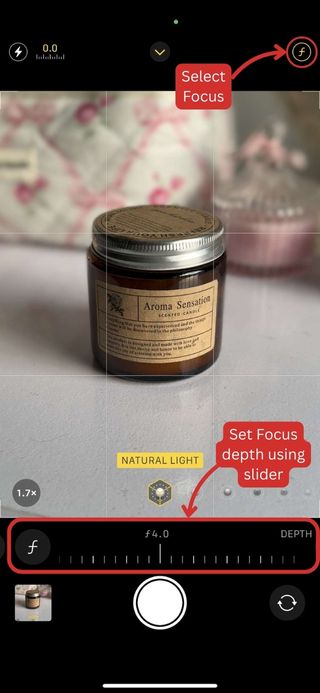
Taking photos in portrait mode saves you the hassle of editing your photos later on and allows you to capture the perfect shot on spot. If you haven’t had good luck with the portrait mode on your iPhone, you likely need to experiment with the features a little more before you can finally get the hang of it.
How To Blur The Background Of A Photo Already Taken With Portrait Mode
You have likely taken your picture, but you’re not quite happy with it. The blur seems a little off and it could use a little adjustment. If you have any of the iPhone 15 models or the ones subsequent to it, you can easily adjust the focus of your subject and the degree of blur of the background by following these steps on how to blur background of photo already taken:
1. Open the photo from your Photo’s app on your iPhone.
2. Next, go to “Edit”, which you can access through the “Adjustments” icon provided below.

3. If your photo was taken in portrait mode, you will find the “Depth Control” slider. You can adjust this to increase or decrease the background blur.
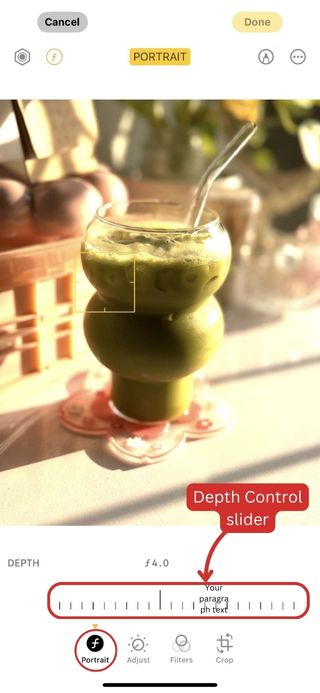
Note: To access the Depth Control slider, make sure that you have selected the portrait icon.
4. If by increasing the blur, your focused subject’s clarity is also getting affected, tap on the subject to bring it into sharper focus, and then proceed to increase the blur to your liking. You’ll notice a yellow focus box around your subject, highlighting it for a balanced final effect.
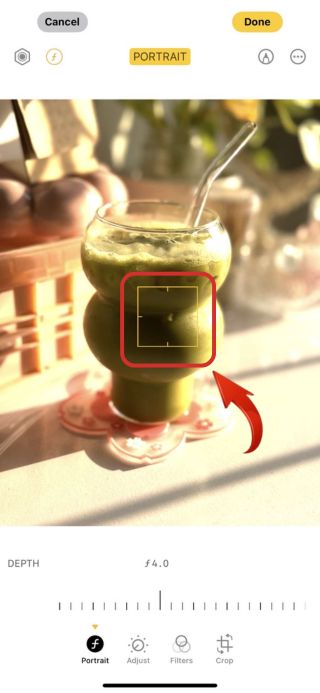
If you have an iPhone 15 or a relatively newer model, you will find this method incredibly easy to navigate through. Everything is right there in front of you and all you have to do is find the right tools to help you achieve that perfect portrait photo.
Method 2: How To Blur The Background Of A Photo Already Taken Without Portrait Mode
We know that iPhones tend to have a set standard for the quality of pictures it is capable of taking and with readily available features like “Portrait” mode available on the camera app, it allows you to further achieve that professional grade DSLR like photos.
However, you might feel a little limited by the built-in features you have at hand especially if you are using any of the iPhone models that are older than iPhone 15, where you cannot always access the degree of blur you want in the photo.
BeautyPlus is a photo editor that can essentially be accessed through any device. If you have any of the predecessor models of iPhone 15, you best have it installed because it will give your photos the professional look, your camera and photos app can’t. You can easily achieve the blur effect, however you want, with this app.
Whether you want the background blurred, your face blurred, or even the subject of your prime focus blurred, BeautyPlus has a brush tool that helps customize the blur you want in your photos. Here’s how to blur pictures on an iPhone with the BeautyPlus tool.
1. Open the BeautyPlus app on your device, available on both iOS and Android, and click on the “Start Editing” button.
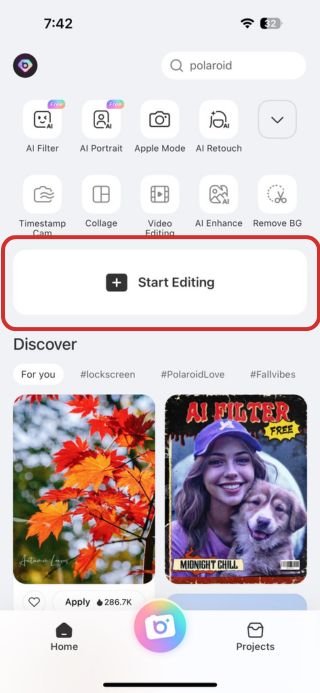
2. Select the photo you wish to blur the background of. This can be taken either in portrait mode or without portrait mode.
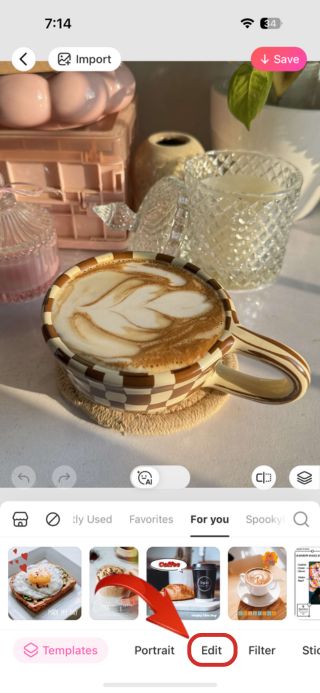
3. After your photo opens, go to the “Edit” tab on the BeautyPlus photo editor.
4. Scroll right on the edit features, and find the “Blur” tool.
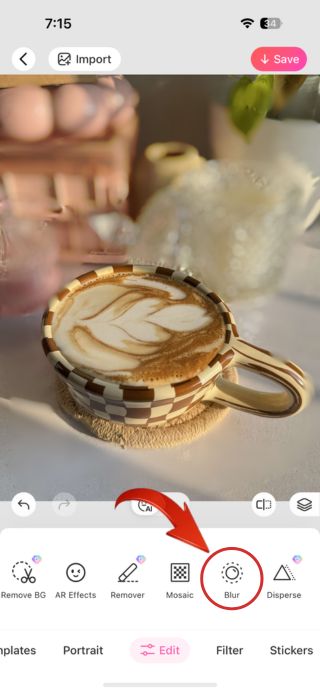
5. You will have multiple blur effects to choose from. To keep your subject in focus, swipe over the areas you want to blur, and the app will apply the effect accordingly.
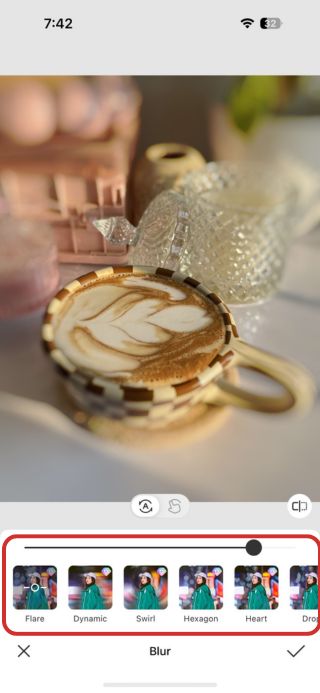
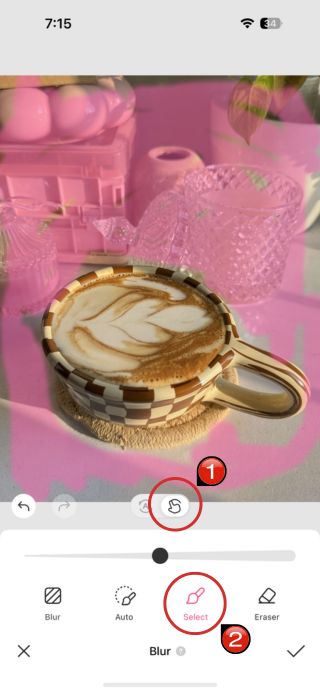
6. You can also use the manual method by clicking on the “Finger” icon to select the manual tool
7. Then click on the “Select” icon and select the area that you need to blur in your image, you will notice the selected area highlighted as pink while you brush.
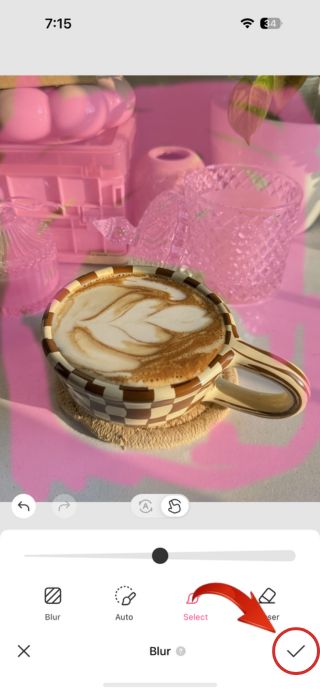
8. Once all the area has been selected, simply click on the “Tick” icon to finalise the blur in your image and then hit “Save” at the top right corner to save your image using the BeautyPlus app.
Now, not everybody can afford to get the latest iPhone. Because of that, you are limited to the problem that you can’t apply or edit Portrait mode effects on photos that were taken without the mode enabled originally. With this method, you can easily achieve that blur effect by BeautyPlus.
Whether you want the background blurred, your face blurred, or even the subject of your prime focus blurred, BeautyPlus has a brush tool that helps customise the blur you want in your photos. Here’s how to blur pictures on an iPhone with the BeautyPlus tool.
Bottomline
We have finally come to a point in time where you can finally learn how to blur the background of a picture on iPhone, where you no longer need to buy a DSLR to achieve professional photos. There is not only a special focus on the subject but the surrounding space is blurred in such a natural way, that everything looks perfectly balanced. You can achieve all of this with a good iPhone alone.
And no, you don’t necessarily need to have the latest iPhone model to be able to adjust the blur of your picture. You can conveniently do that by simply downloading the BeautyPlus app on your phone.
BeautyPlus will allow you to add blur to your pictures however you like and in a matter of seconds you can get yourself the best portrait photo ready to go.


