How to Extend Background in Photoshop: 4 Simple Methods!

There are times when we wish to have a photograph taken from a wider angle. Luckily, this can be achieved even after taking a picture by extending the background in Photoshop. This enhances the visual appeal of a photograph.
Moreover, extending the background of an image in Photoshop can help a graphic designer to easily fit images into new dimensions to make attractive social media posts or website banners. It also provides depth to an image while drawing attention to the main subject thus allowing editors to create balanced compositions.
The most common tool used for this purpose is Adobe Photoshop. Here’s how to edit an image in Photoshop to expand its background!
Part 1: How to Extend Background in Photoshop
Watched a tutorial to learn how to expand my background in Photoshop but still cannot understand it? Here’s an easy guide to getting there!
Method 1: Content-Aware Fill
Content Aware fill is a powerful feature in Photoshop that helps you to extend an image with a relatively simple background. It intelligently fills in the extended empty space with a background similar to that of the photo and blends it seamlessly to provide you with the perfect results.
To expand the background using content aware scale, follow these steps:
- First, sign in with Photoshop and open the image that you wish to edit
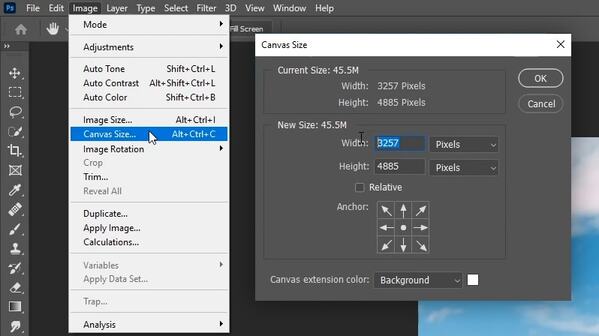
- On the top left, you will see an option “Image” written along with file and edit. tap on this option and a drop-down menu will appear
- Click on “Canvas size” and a small window will open on the screen

- From there, you can select to increase the height and width of the image to your desired size
- If you want the extended background to be filled with a particular color, you can choose it from “Canvas extension color”
- If you wish to fill in the extended area with the same background as the image, keep the color white
- Uncheck the “Relative” option and tap OK
- You will now get the extended image
At this point, the image is expanded to your required size but it comes with a white extended background. To fill in the image with the same background, do this:
- On the left side of the screen, you will see a rectangular marquee tool in the toolbar. Tap on this and select the background area that is blank
- Right-click on the selected area and tap “Content-aware fill”
- A menu will pop up on the right side of the screen for customization. After deciding all the settings, click ok and the background will be added to the image
- Now do the same for other sides and export your image
Method 2: Content-Aware Scale
You can also use content-aware scale in Photoshop to extend the background of an image without distorting any key elements. This feature is specifically useful when you want to extend the background of a vertical image. Here are the detailed steps:
- Open the image in the Photoshop tool. As the image is vertical, you will need to increase the canvas size of the existing image
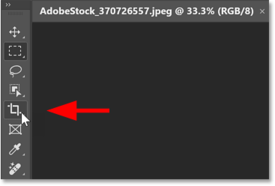
- Click on the crop tool. It is the fourth option in the toolbar
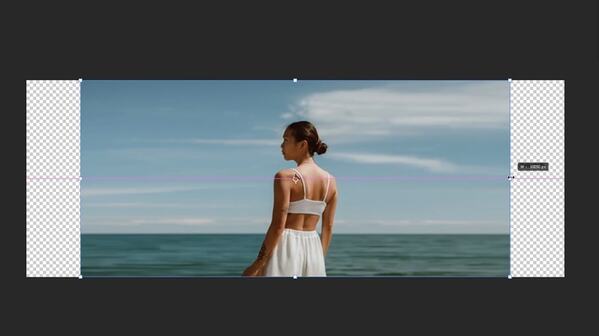
- Hold and drag the crop box to create an additional background on the sides of the image. This indicates the extended background of the image.

- Click on the Tick icon in the middle of the screen
- Then go to edit and tap on the content aware scale
- Hold shift and alt button to expand the image vertically and horizontally while dragging the crop box to the sides
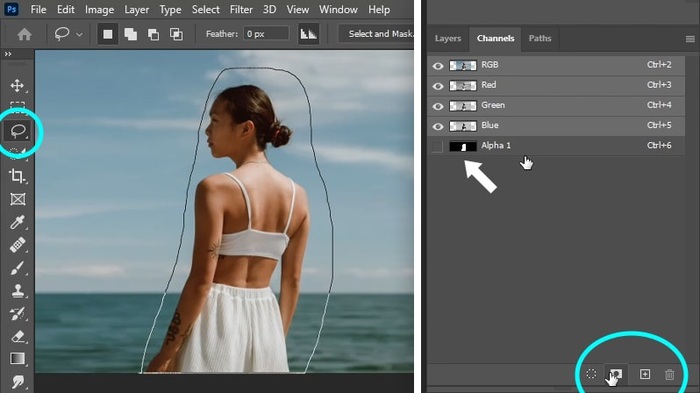
If the subject moves vertically or horizontally along with the background, use the lasso tool. To select this tool, go to the toolbar at the left side of the workspace and tap on the lasso icon above the crop tool
- Mark the boundary of the subject using the lasso tool and go to channels

- Tap on the square (second option) at the bottom right of the screen. It will create a new channel by a specific name and click CTRL-D which is a shortcut key to deselect
- Hit the layers option alongside channels and go to the content-aware scale tool. In the middle of the screen, you will see a drop-down menu. From there, select the channel that you want to protect
- Now you resize the background of any image easily while retaining the main subject in its original state
You must keep in mind that this photo editing feature in Photoshop is not useful on images with busy backgrounds having too many elements in them. It is helpful for images with a simple and repeated background.
Method 3: Adobe Generative Expand
There is another tool called Adobe Generative AI tool that also allows you to expand an image to fit your desired size and create stunning visuals. Here are the steps to use this tool in Photoshop:
- Select the image that you want to modify and open it in Photoshop
- Go to the toolbar to select the crop tool and drag the sides of the crop box that appears on the boundary of the image to create a blank canvas area to decide the area for an extended background and press Enter
- Now, you will need the generative fill tool to fill the extra space. For this, go to the Contextual taskbar and hit Generate

- Here, it will ask for a prompt about the kind of content that you want in that blank space. You can also leave it blank. The tool will create an image background by itself by intelligently detecting the pixels of the photo provided
- Click generate again and the final image will appear on your screen
Method 4: Extend a Background in Photoshop while Protecting the Subject
If the lasso tool seems a little complex for you to choose, let us show you how to extend the background of an image while protecting the subject without using this tool:
- Open the image and press CTRL+C to use the crop tool and extend the canvas of the image that needs to be edited

- Hold the ALT button of your keyboard and drag the crop box to the sides till you attain the desired background size
- Hit the tick button. Now go to the Select option in the menu bar and click Subject
- It will automatically outline the main subject
- To save this. go to select again and tap on the Save Selection option in the dropdown menu
- Mention the name of the Subject and save it. Press CTRL+D to deselect the subject
- Now you will fill in the background using the content-aware scale. Before resizing the image, tap the drop-down menu of the “Protect” option visible in the center of the screen
- Click the Subject that you want to protect. This will prevent it from extending along with the background
- Now hold the ALT+SHIFT button and expand the background as much as you want
Part 2: Alternative Tool – BeautyPlus AI Image Expander
It can be a bit complicated for beginners to expand the image background in Photoshop using its tool. How about switching to an online tool that is quicker and easier Adobe?
It is the BeautyPlus AI Image Expander. This AI-powered tool requires only a minimal effort to expand the image and help you achieve the desired results. Moreover, it is available as an online tool and an app to use on mobile phones.
Key Features of BeautyPlus AI Image Expander
Here are its key features:
- It detects the pixels of an image intelligently and adds natural elements in the background that suit well with the image well. This seamlessly blends the extra background with the existing image
- If you are looking for a tool to resize images for social ads, BeautyPlus can do that too while maintaining the sharpness of the image
- This user-friendly tool saves you from manual retouching of the image thus saving lots of time and effort
- Normally we crop images however, BeautyPlus can uncrop them for us. It restores the missing parts of an image thus making it complete and more attractive
How to Use BeautyPlus AI Image Expander
Let’s learn how to extend an image background using the BeautyPlus AI image expander:
- Go to BeautyPlus Image Expander and you will see a pink box with the “Upload Image” option on the screen

- Drag and drop the required image here
- If you want to upload an image from mobile, tap on “Upload from Mobile”
- Choose the required ratio and hit the Generate button
- Finally, tap on the download option to save the photo on your device. If you do not like it, you can also choose to regenerate the image
Conclusion
You can extend the background of an image using Photoshop. It offers various tools like Content-aware fill, Content-aware scale, and generative AI to enlarge the picture background to the desired size.
The first two methods are useful for simple images while Generative AI can also add new elements to the background to enhance its visuals. However, it can be a little complicated for beginners to use it.
They can rather use BeautyPlus which is an online user-friendly image-expanding tool. Choosing one between these two tools must be according to your needs, whether you want the depth of Photoshop or enjoy the ease of BeautyPlus.


