
How to Make a Logo Transparent Professionally and Easily
Logos are more like a stamp on the paper claiming ownership of the document, report, project, presentation, or even a work of art and at times you can create your own personalized logo as well; but that’s a story for another day.
Today, we will tackle the annoying problem of logos with backgrounds! Logos often come with a background, which can cause issues when trying to place them in various files, especially if you’re aiming for a clean or transparent look.
Regardless of what the background colour is, you can make a logo transparent, but you will need tools for this, and we have gathered all the right tools for you! In this article we will walk you through some image background removers, to help you make logos transparent.
How to Make a Logo Transparent with BeautyPlus
We will begin our list of logo background removers with BeautyPlus. Not only is BeautyPlus a gateway to all the online trending photo editing tools like Photo to Anime Converter, AI Image Extender, Image Filters. It also has the Image Background remover tool in the same drop-down menu as the other tools, and in terms of usefulness – just as much!
The reason why we have BeautyPlus in this list? The simplicity. BeautyPlus makes the entire workflow of making a logo transparent a 1-minute task. Here is how:
1. Since BeautyPlus background remover is an online tool, let’s quickly switch over to a new tab, and navigate to their website to access the tool.

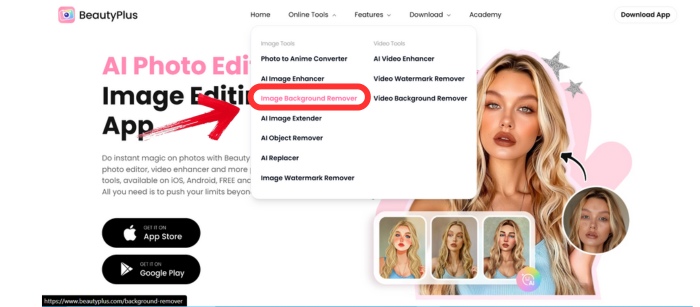
2. BeautyPlus has all its tools and resources organized on the toolbar and the way to access the background remover is by simply hovering over the “Online Tools” tab and selecting the “Image Background Remover” option from the drop-down.
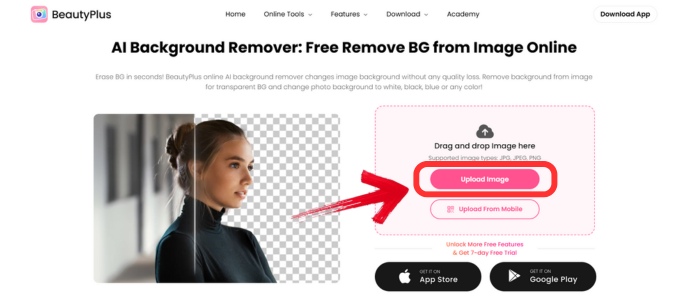
3. You’re now on the BeautyPlus Online Image Background Remover tool where to start with the background removal process, click on the “Upload Image” button and select the logo.
4. With the logo now uploaded, your work is partially done, as BeautyPlus will now process and remove the background from the logo.
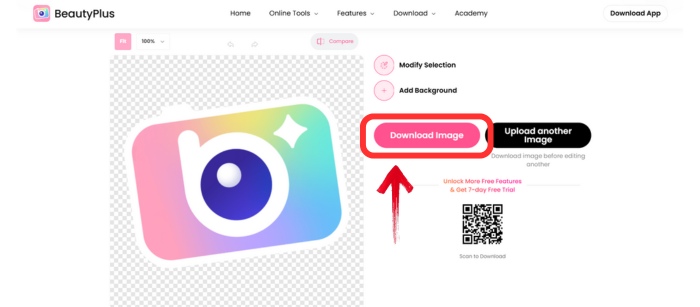
5. Once the background has been removed, you will have the results on the left to preview, and to save the image, you have the “Download Image” button on the right.
How to Make a Logo Transparent in Canva
If you are looking for a tool that gives you an all-in-one solution to get all your graphic designing projects under a single window, Canva is most certainly the first tool that pops to mind where you can also explore options to create Presentations, Word documents, CVs, Logos, Menus, and posters.
While the software provides a free version, users will have to pay for the logo background removal feature. Canva offers premium features at an incredibly affordable pricing plan and the process on how to make logos transparent in Canva is really simple and only requires a few easy steps:
1. You would need to get started with Canva first which you can have it opened on your PC, by going to the Canva website, you can also choose to open it on your phone regardless of its OS and sign in.
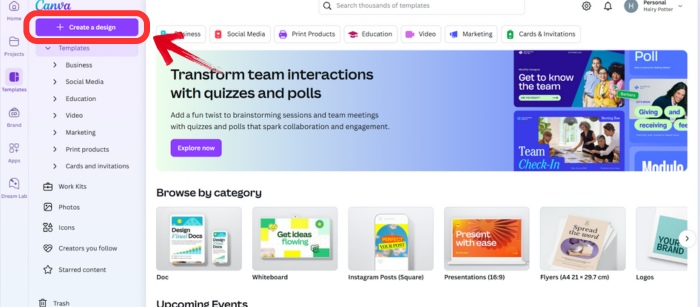
2. You would want to create a new design and to do that, click “Create a design”, which should be on the left of Canva’s home page.
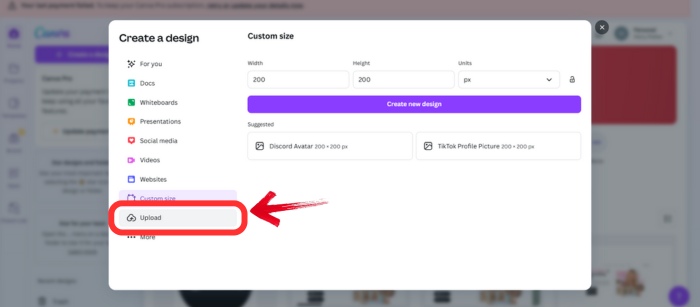
3. A design selection pop-up will open in front of you, showing you various pre-made templates such as Whiteboards, Social media, and Websites, but for now, you will click on “Upload”, which is right at the bottom.
4. The next step of the procedure is about dragging the logo you want to use to the website which you will find amongst your files.
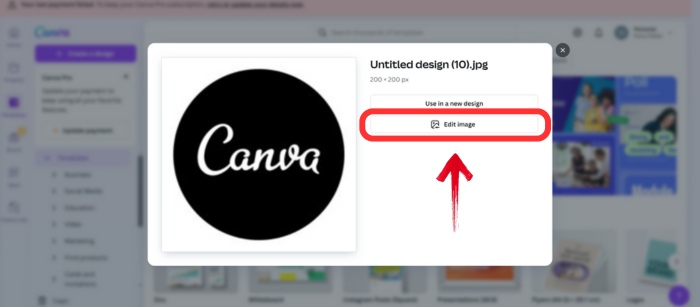
5. Two options will be given to you. Click on the second option, “Edit Image”.
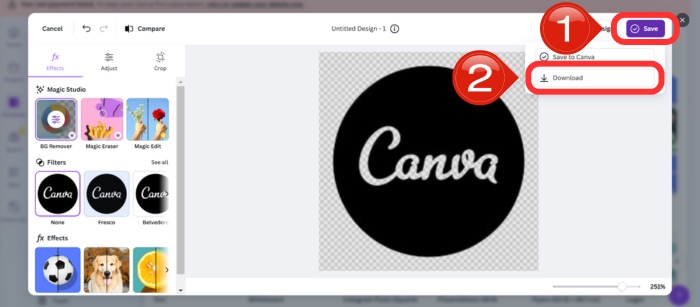
6. As a new window opens, you will find your logo on the right side and a few types of tools where in the category of Magic Studio, you will find “BG Remover”. Go ahead and tap it.
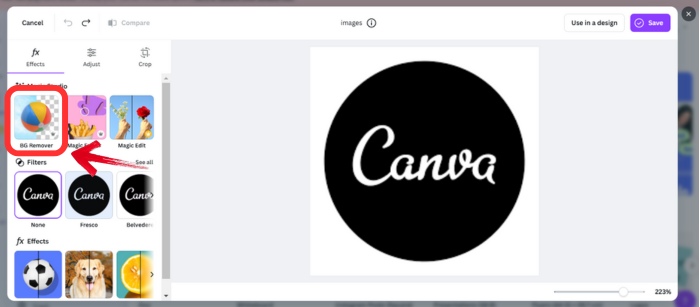
7. The background will undergo removal automatically. To preserve what you have created, press “Save”, and then in the options press “Download”.
How to Make a Logo Transparent in Photoshop
The best way to challenge your digital arts creativity and skills is by getting yourself a subscription to Adobe Photoshop, which we know as a popular application that enables one to illustrate, enhance photo quality and place images, interact with 3D props, and cut out an image’s background.
It is after all a premium tool and so doesn’t have a free-of-cost option, but gives top-notch results without compromising on quality. You can use it as a beginner who is getting into graphic designing, and even as a professional textile designer because it is that versatile. Finally, here is how you can make logos transparent in Photoshop:
1. To make your logo transparent in Photoshop, you will first need to select the “Magic Wand” on the left toolbar, or you can just press “W” on your keyboard to make use of the keyboard shortcut.
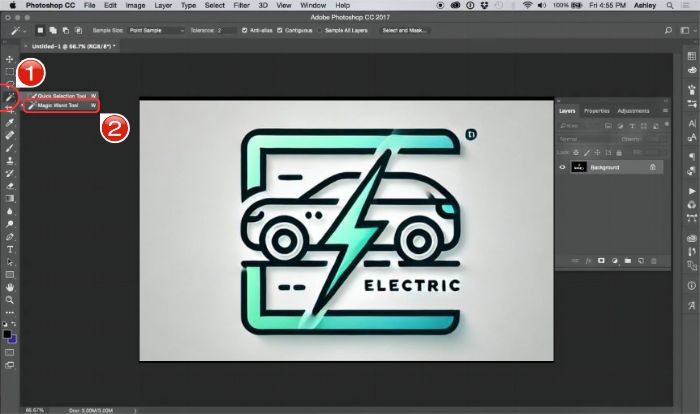
2. Next up, you will need to click on the background to select it, this way we can easily just cut out the background from the image.

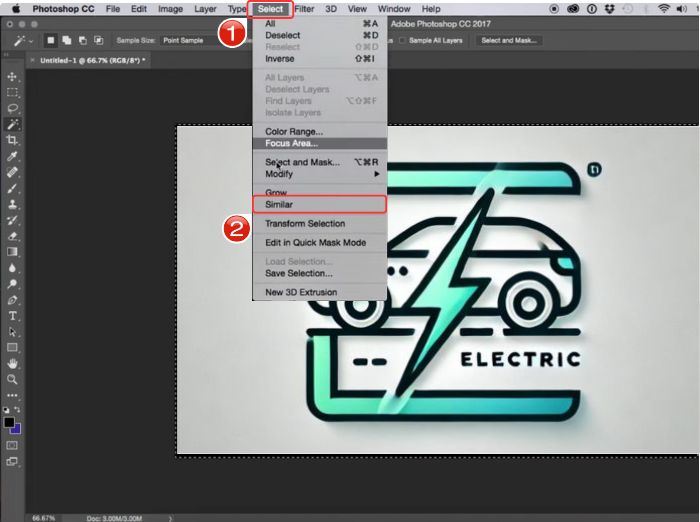
3. To get all the pieces of the background selected, you next need to use the Similar tool, just click on the “Select” option in the toolbar, and then select the “Similar” option from the drop-down.
4. We actually need the inverse of the selection, to remove the background, so go back to the “Select” option, but this time click on the “Inverse” option from the drop-down.
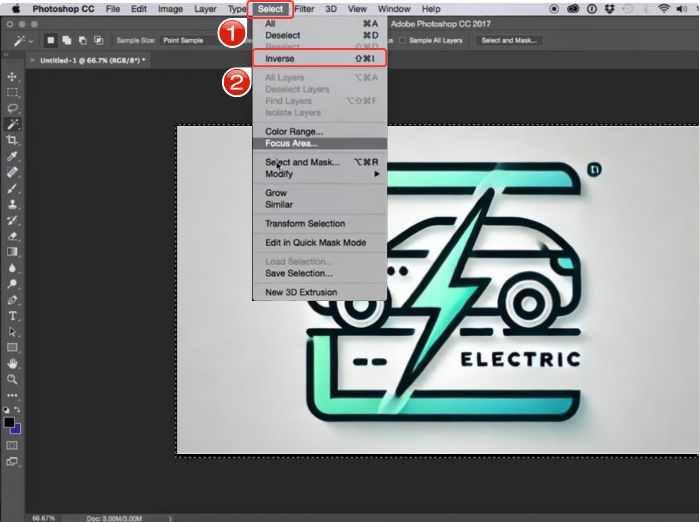
5. You now have the background selected, the final step is to click on the “Mask” icon on the Panel.
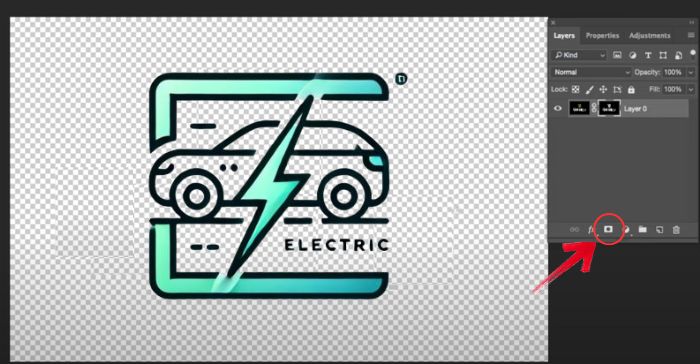
6. The background will now be masked and your logo is now background-free, you can go ahead and save the transparent logo for future use.
How to Make a Logo Transparent in Powerpoint
It is nearly impossible to have not heard the name of Microsoft PowerPoint in today’s world. It is applicable from all the personal and professional sittings; be it making a presentation for your university assignments or showcasing a new marketing strategy in an office meeting.
By making use of PowerPoint, you can polish slideshows by taking advantage of the provided templates, animation effects, font styles, and many others and to make things further easier for you, you can now remove the background of images directly in the PowerPoint. Here is how you can make logos transparent on PowerPoint:
1. You can start by creating a new blank PowerPoint on the Microsoft PowerPoint app on your PC
2. Next up, you need to import the logo from which you need to remove the background by simply heading over to the Insert tab on the toolbar.
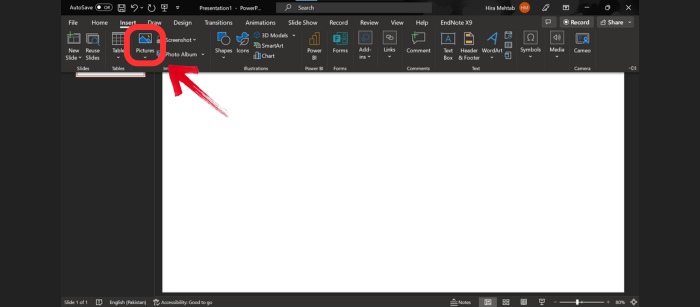
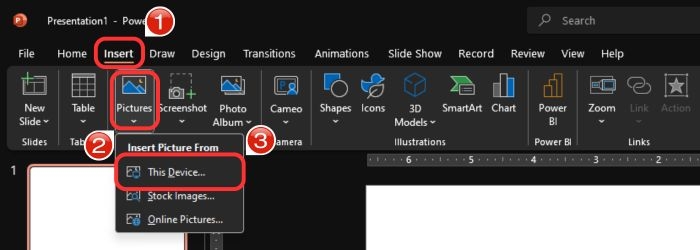
3. Within the Insert ribbon, you will have the “Pictures” option, click on it and then select the source of your logo; if you have the logo saved on your PC you can click on the “This Device” option.
4. Now that we have the image on PowerPoint, let’s begin formatting the image. To do this, you need to select the image, and then go to the “Picture Format” tab.
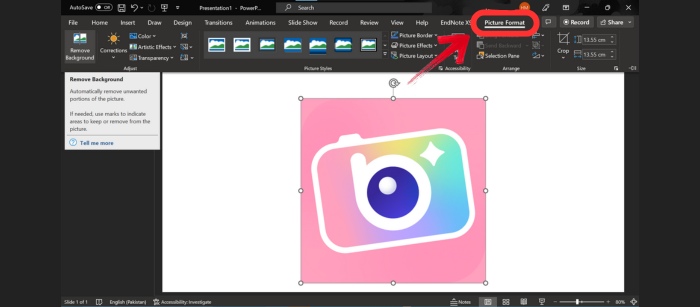
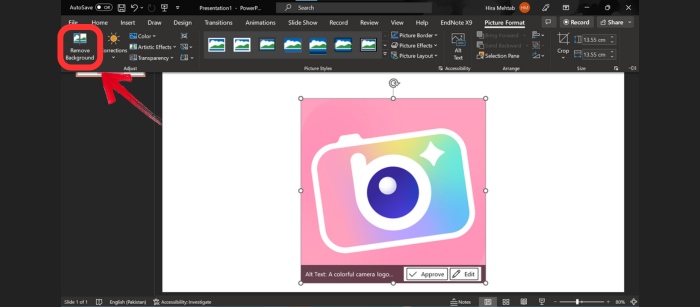
5. Within the Picture Format ribbon, you will now have to click on the “Remove Background” option, and open a few set of options and settings of the background remover tools on PowerPoint.
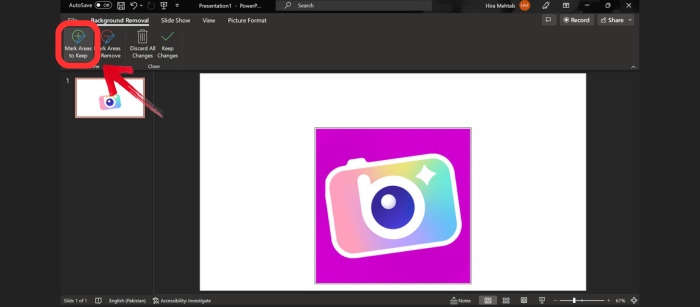
6. All the areas that PowerPoint has highlighted as removable will be coloured with Magenta. If there are areas that you do not want to remove, click on “Mark Areas to Keep” option on the ribbon and select those areas.
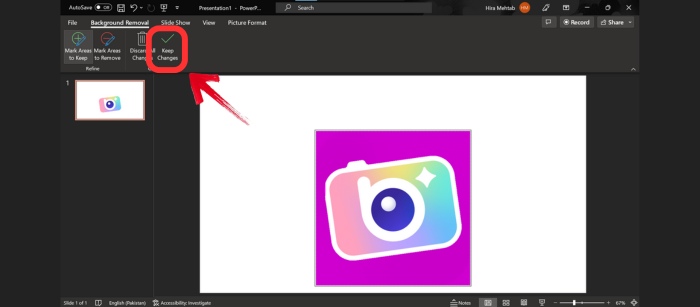
7. Have your background removed from your logo? Go ahead and select “Keep Changes” to save the changes you just made.
8. You can continue with your slideshow or you can save your work as a PowerPoint file by going to the File tab and clicking on “Save As”.
Bottomline
The next time you come across a logo, and can’t integrate it with the rest of your design or image, you can try using one of these tools to make a logo transparent. Photoshop is a great choice but can feel a little limiting because it does often require you to have prior experience with the tool, but if you’re just setting foot in photo editing, BeautyPlus is something you will enjoy using the most, not just for removing background, but for other image editing tasks as well! It’s an online tool, that requires minimum human intervention, and provides amazing results; BeautyPlus is practically designed to produce results like an advanced image editor, but as easy to use as a standard day-to-day app.


