

iPhone Object Eraser: How to Use Object Eraser on iPhone?
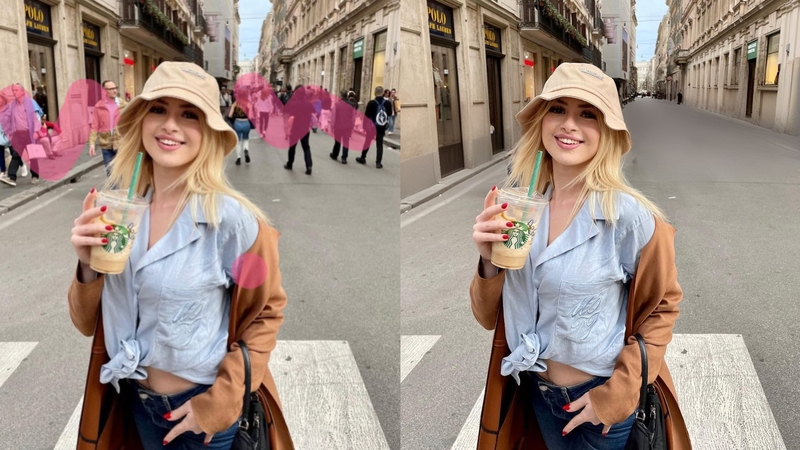
We’ve all had those instances where we take the perfect photo, the perfect memory to add to our family album, only to have one pesky little detail in there that ruins the whole picture. It could be a random person walking in front of you before the camera shutter closes. It could be a garbage can in the corner ruining the aesthetic of what would have been the perfect angle and lighting for your Instagram feed.
You’re stuck with that photo, now what? Do you take it to a professional to meticulously edit out the unwanted parts? Not all of us have the time or the funds to remove person from photo iPhone. Fortunately, our latest iPhones have one feature that is not nearly as popular as it should be. You don’t have to hand your pictures to a professional because now, thanks to the iPhone Object Eraser, your perfect moment is only a couple of clicks and taps away.
How to Erase Objects with iPhone iOS 18
So let’s begin. First things first, make sure you have updated to iPhone iOS 18.1 and that you have Apple Intelligence turned on. This feature is available in any Apple silicon MAC, any Apple silicon iPad, iPhone 15, and iPhone 15 Pro Max, and of course, it will be available in the models to follow, such as the iPhone 16 series. Now that you have everything ready, let’s get into it.
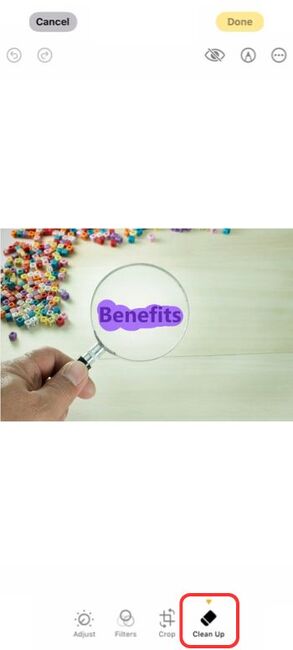
1. Open the ‘Photos’ app on your iPhone and pick out a photo you’d like to ‘clean up’.
3. Now hit the edit button at the bottom and click the little eraser at the bottom right labeled ‘Clean Up’.

4. Once you do that, the phone will take a moment to download and analyze the photo.

5. Once it’s done, it uses AI to highlight some of the objects that seem to be obstructing the view and highlights them for you.
6. Now, all you have to do is tap on the object and watch it vanish like it was never there. Just tap and viola! All cleaned up. The AI will seamlessly fill out the space where the object once was to give you a photo that looks completely natural, as if it had no flaws to begin with. Neat!


The best part about this feature is that you’re not limited to the objects the AI picked out for you. Once the photo is analyzed, you can simply drag your finger over any object to color it in, or circle the object you’re trying to erase, and the AI will erase it. This works for objects of all sizes, depending on the background and how much of the ‘space’ created by the eraser tool the AI can ‘fill out’. Needless to say, it works best if the object in question is small to average-sized.
How to Erase Objects for iOS 16+
Sometimes we don’t want the additional expense of an upgrade. Other times, we’re just attached to our phones. Whatever the reason may be, don’t feel pressured to purchase an iPhone 15 just because Apple released the iPhone object eraser feature in the latest models. You too can enjoy all the editing features and more of an iPhone 15 on your iOS 16+. Here is a list of applications you can use to get the same results.
BeautyPlus
The BeautyPlus App is iOS and Android compatible, has a ton of features that were previously exclusive to iOS 18 models, and is extremely easy to use. The user-friendly interface makes it all the more appealing. Look up BeautyPlus on the App Store and download it. Once you’ve downloaded the app, here is what you need to do:
1. Open the app, you will be greeted by a welcome screen followed by a dashboard.
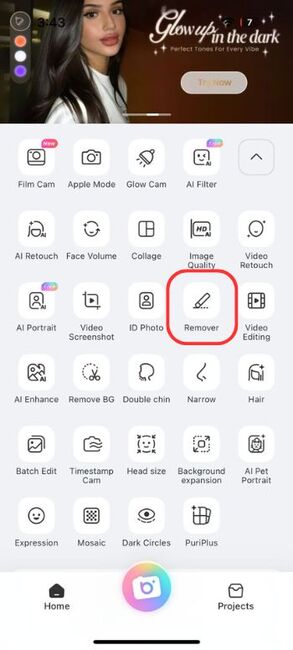
2. On the dashboard, you’ll see several features and a drop-down button to display more features. Go ahead and click the arrow under the features on the dashboard.
3. Once the dashboard extends, you will get to see all the other features available on the App. Click on the little eraser labeled ‘remover’.
4. Allow BeautyPlus access to photos and media on your phone.
5. Select a photo from your gallery.
6. The photo is uploaded. Use your finger to color the object you want removed. Once you’re happy with the part you’ve ‘colored’, we move on to the next step
7. You get 3 options to choose from, ‘AI Removal’, ‘Classic’, and ‘Restore’. For the best results, click ‘AI Removal’.

8. Wait for the AI to process the image and the part you’ve highlighted, and within a couple of seconds, you have an image with the object removed and the space filled in by AI to give you a flawless finished photo. It’s that simple.
9. On the top-right, you’ll see a save button; click it. Your edited photo is now saved in your gallery.

Note: For a smooth, ad-free experience, it is best to try out premium.


Google Photos
This is probably one app that you already have on your phone; if not, you may want to download it now. You’ll be pleased to know it comes with an eraser option similar to the iPhone object eraser. You can use the magic eraser on iPhones as well as Androids.
1. Open Google Photos and make sure that you have given the app access to your media
3. Select the photo you want to edit.
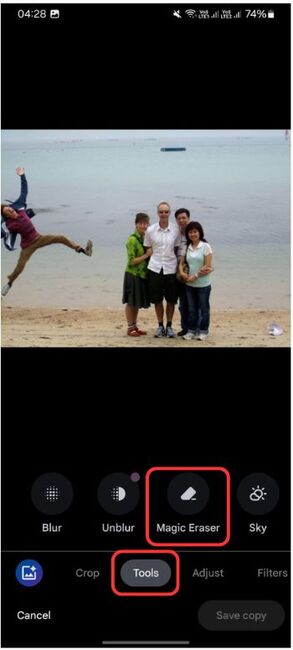
4. Tap edit at the bottom of the screen.

5. Swipe through the options and select tools
6. Under the tools section, select ‘magic erase’
7. Use a brush to color in the object you want erased, OR
8. Circle the object you want erased.
And there you have it, in 8 easy steps, your picture-perfect moment is ready for you to download.


Other Features of iPhone Clean-Up
There are a few more nifty features in the iPhone object remover. A number of them are as follows:
Remove People
The feature is an ‘object remover’, yes, but it also allows you to remove any random bystanders in your photos. All you have to do to remove people from background is select your picture, click edit, and click on ‘clean-up’.
Remove Text
You can also remove any unwanted text in your photo. Let’s say it’s something private, like a mailing address that accidentally got captured in the photo, you can use the same process that you used to erase objects and people to erase text.
Blur People’s Faces
In an age where everything is out there on the internet, privacy is a luxury. There are some photos that you simply cannot put out there because they include photos of your loved ones, and you don’t want to infringe their privacy, you can simply use the iPhone object remover to blur out faces.

Remove Blemishes
Probably one of the worst feelings is to capture a nice photo of yourself, only to zoom in and see a blemish right there on your forehead, or worse, your nose. No need to use a filter, just use the object eraser tool to give yourself a little touch-up before you post that photo on your Instagram story.

FAQs on How to Use Object Eraser on iPhone
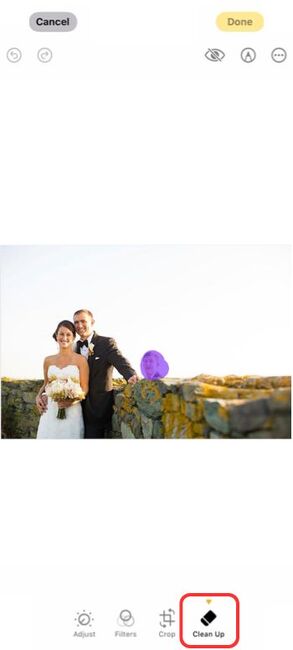
1. On your iPhone, launch the “Photos” app.
2. Select a picture that you want to “clean up.”
3. Click the ‘Clean Up’ tiny rubber at the bottom right after selecting the edit button at the bottom.
4. The phone will then take a moment to download and process the picture.
5. When it’s finished, it highlights for you some of the objects that appear to be blocking the view using artificial intelligence.
6. Now tap on the object and it will disappear
The feature is available in any Apple silicon MAC, any Apple silicon iPad, iPhone 15, and iPhone 15 Pro Max, and the models to follow, such as the iPhone 16 series. If you have the required device and the feature still does not work, make sure you have your device updated to iOS 18 and that you turn on Apple Intelligence.
While the Clean Up feature is impressive, it does have its limitations and can have unwanted side effects. If you observe any blurriness or streaks in your image because of the clean up. Use the BeautyPlus AI image enhancer to improve clarity and sharpness. Simply open the BeautyPlus App and enhance your photos via the photo enhancer tool.
Bottom Line
It doesn’t matter if you’re taking photos on a busy New York street or if you went to see tourist attractions and there are just too many people intruding on your special moments, you now have just the right tools to not only pick and choose what to include in your memories but also make them all the more lovely and cherishable. You no longer have to let little flaws dim your confidence or hide away those pictures in the depths of your gallery simply because they’re not perfect enough. These features allow us to make any moment …just right.